 ( 87 ) 9-June 2013
Now I turn my attention to the bracing. Here I am laying out the templates and selecting the brace stock.
Walnut Body
Sitka Spruce Top
Mahogany Neck
Pistachio Fretboard, Bridge, and Headstock
Maple Binding
Herringbone Purfling
Gold Frets & Gotoh Tuners
25.4 Inch Scale Length
( 87 ) 9-June 2013
Now I turn my attention to the bracing. Here I am laying out the templates and selecting the brace stock.
 ( 88 ) 9-June 2013
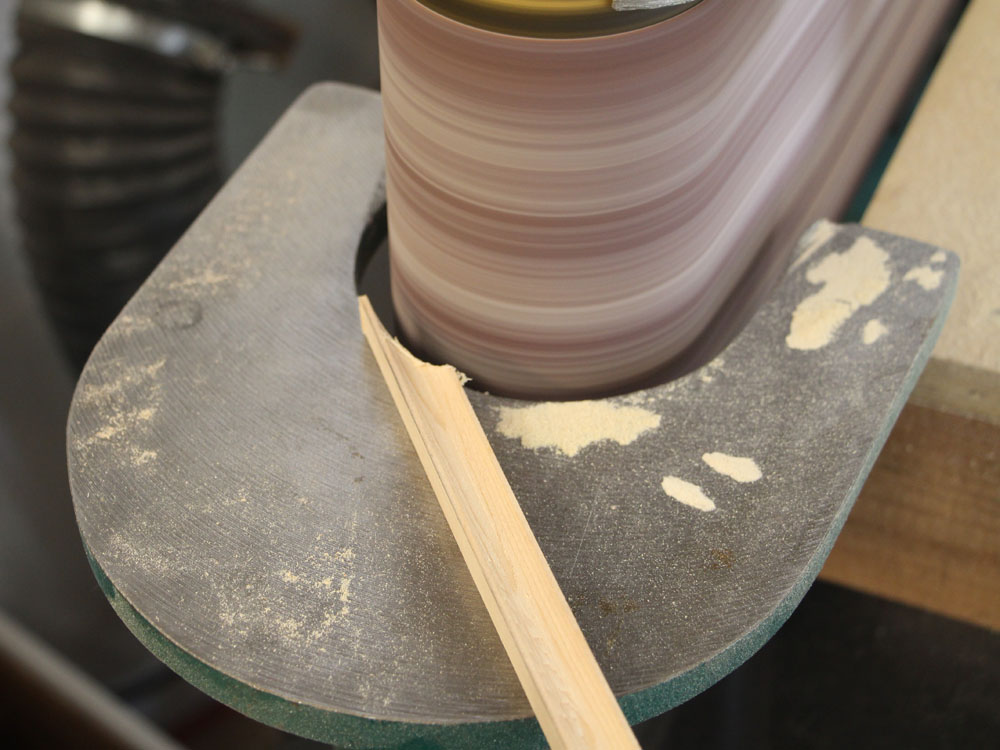
To shape the bottom of the braces so they match the shape of the top I use this sanding template.
 ( 89 ) 9-June 2013
To use this system I mount the brace stock on the template with a portion hanging over the edge of the template. The white guide board in this picture has a metal lip that the template will ride against.
 ( 90 ) 9-June 2013
When I am done, the brace stock will have the same shape as the template, which mirrors the shape of the sound boards- top or bottom.
 ( 91 ) 9-June 2013
I then rough trim the top of the brace blank.
 ( 92 ) 9-June 2013
To ensure that the fit is good I fine tune the brace blank on the form with a bit of sandpaper.
 ( 93 ) 9-June 2013
Here are the two X-braces and the tone bar blanks.
 ( 94 ) 9-June 2013
The back braces are made in the same way.
 ( 95 ) 9-June 2013
The back brace blanks laid out on the back form.
 ( 96 ) 9-June 2013
Now I am going to drill the holes in the braces. I want to leave about 50 mil between the bottom of the holes and the bottom of the brace. I use a spacer between the drill bit and the drill guide.
 ( 97 ) 9-June 2013
Now I drill the holes.
 ( 98 ) 9-June 2013
Lots and lots of holes.
 ( 99 ) 9-June 2013
Here I am trimming the thickness of the tone bars.
 ( 100 ) 9-June 2013
To make I-beams out of the braces I use the routing table. I use the same spacer I used to drill the holes to set the offset of the router bit.
 ( 101 ) 9-June 2013
I will run the brace blank through the router, raising the bit until I am happy with the shape.
 ( 102 ) 9-June 2013
When I am finished I end up with a nice I beam.
 ( 103 ) 9-June 2013
Here I have carefully marked out the portion of the X-braces that I don't want to rout out. This is where the X-braces will cross each other with a lap joint.
 ( 104 ) 9-June 2013
A look at the raw x-brace.
 ( 105 ) 9-June 2013
Working on more braces.
 ( 106 ) 9-June 2013
 ( 107 ) 9-June 2013
Now with the raw braces made- I haven't shaped the top of the braces yet- I lay out the shape of the body on the sound plates.
 ( 108 ) 9-June 2013
Once I know final length of the braces I can finish shaping them
 ( 109 ) 9-June 2013
I use the disk sander to finish up the braces shape.
 ( 110 ) 9-June 2013
 ( 111 ) 9-June 2013
In use two marks to set the width of the ends.
 ( 112 ) 9-June 2013
And then I trim the profile of the braces.
 ( 113 ) 9-June 2013
Here I have laid out the back braces on the back plate
 ( 114 ) 9-June 2013
I like to sand the inside of the holes to make them nice and smooth. Wayne Henderson says it makes it easier for the notes to get out of the guitar... who am I to argue with Wayne Henderson.
 ( 115 ) 9-June 2013
And a bit of hand sanding finishes up the braces.
 ( 116 ) 9-June 2013
 ( 117 ) 9-June 2013
Before cutting out the back plate I like to mark the shape with a bit of extra room.
 ( 118 ) 9-June 2013
And then the bandsaw is used to cut out the back.
 ( 119 ) 9-June 2013
 ( 120 ) 9-June 2013
Now I can reduce the back plate to near its final thickness.
 ( 121 ) 9-June 2013
It will get a bit thinner as it is worked in the finishing steps.
 ( 122 ) 9-June 2013
Before I glue the braces on I like to give the bottoms a fresh surface.
 ( 123 ) 9-June 2013
And then they get a bit of glue.
 ( 124 ) 9-June 2013
Here I have started to glue the braces in place using my go-box.
 ( 125 ) 9-June 2013
Once the brace is pressed into place with the go-sticks I clean up the squeeze out with a brush.
 ( 126 ) 9-June 2013
More go sticks.
 ( 127 ) 9-June 2013
 ( 128 ) 9-June 2013
My go-box has a matrix of blocks on the top surface so I can get just the right amount of pressure on the braces.
 ( 129 ) 9-June 2013
After the glue cures overnight I clean up all of the surfaces with a bit of sanding... making it easier for the notes to get out.
 ( 130 ) 9-June 2013
Now I turn my attention to the top plate. Here I am trimming the X brace.
 ( 131 ) 9-June 2013
And I lay them out for a look see.
 ( 132 ) 9-June 2013
I use my French-curve sanding block to make the height of the two braces equal.
 ( 133 ) 9-June 2013
The X-braces cross each other at 93 degrees so I have a tilted bandsaw platen the will me just the right angle as I cut the lap joint channels.
 ( 134 ) 9-June 2013
I carefully trim out the channel for the lap joint.
 ( 135 ) 9-June 2013
I want the two braces to fit snuggly together as I can make them.
 ( 136 ) 9-June 2013
 ( 137 ) 9-June 2013
A nice fit.
 ( 138 ) 9-June 2013
Once again I trace out the shape of the guitar on the sound plate, giving myself a fair amount of over hang.
 ( 139 ) 9-June 2013
Now with the sound board laid out I can trim the ends of the X-braces to shape.
 ( 140 ) 9-June 2013
My special sanding block comes in handy again.
 ( 141 ) 9-June 2013
And the end of the brace gets marked.
 ( 142 ) 9-June 2013
And shaped on the disk sander.
 ( 143 ) 9-June 2013
I use an asymmetrical bracing system where the bass side of the X-brace is trimmed down to make it have a lower frequency resonance than the treble side. This system results in a frequency response function of the guitar that is wider and more even than a symmetrical X-brace pattern.
 ( 144 ) 9-June 2013
Lining up the bass side of the x-brace.
 ( 145 ) 9-June 2013
And rough trimming the other end.
 ( 146 ) 9-June 2013
The treble side of the X-brace remains evenly tall until it nears the end, where it is terminated with a scallop. This results in a higher frequency resonance of the brace.
 ( 147 ) 9-June 2013
Then the end gets marked.
 ( 148 ) 9-June 2013
And trimmed to shape.
 ( 149 ) 9-June 2013
And the end is angled to match the contour of the rim.
 ( 150 ) 9-June 2013
Now I cut out the sound board.
 ( 151 ) 9-June 2013
In subsequent steps I will need accurately place the rim on the top several times. To do this I use what I call fiducial buttons. Here I am frilling a shallow hole for the button.
 ( 152 ) 9-June 2013
I insert a short piece if doweling in the hole, put a small drop of glue on the end of the dowel and then position the rim on the sound board. When the glue is dry and I pull the rim off, the fiducial button is glued to the top. Now I can repeatedly reposition the rim in the on the top.
 ( 153 ) 9-June 2013
There is always a little squeeze out, so I clean it up with this plug cutter.
 ( 154 ) 9-June 2013
I use the same technique to position the X-braces on the top.
 ( 155 ) 9-June 2013
Just to make sure the braces will sit flat against the top I put a small fillet on the button holes.
 ( 156 ) 9-June 2013
 ( 157 ) 9-June 2013
Now, with the braces in place I place the rim over the top of the braces.
 ( 158 ) 9-June 2013
And scribe a line in the top of the braces where they meet the rim.
 ( 160 ) 9-June 2013
Now I can accurately trim the end of the brace to the scribe line.
 ( 161 ) 9-June 2013
And when the rim is placed on the top the braces make a good tight butt joint. I go to all of this effort to get the braces and the rim to line up accurately so that the force created by the string tension is effectively transferred from the neck through the braces and into the bridge.
 ( 162 ) 9-June 2013
The end of the A-frame brace is shaped to a conformal profile.
 ( 163 ) 9-June 2013
Once again I am striving to effectively transfer the forces through the braces.
 ( 164 ) 9-June 2013
I use the same process to measure the length of the A-frame braces.
 ( 165 ) 9-June 2013
A scribe line at the heel block.
 ( 166 ) 9-June 2013
And when the braces are trimmed to length they make good contact with the heel block. Now you can see how the forces are transferred from the neck to the heel block and then into the A-frame braces and finally to the X-braces and the bridge. I am striving to minimize the stresses on the top.
 ( 167 ) 9-June 2013
A look at the heel block and A-frame brace joint.
 ( 168 ) 9-June 2013
Now back to making the tone bars.
 ( 169 ) 9-June 2013
And the finger braces.
 ( 170 ) 9-June 2013
The disk sander is used to shape the finger braces.
 ( 171 ) 9-June 2013
And a little sanding to match the bottom of the braces to the shape of the top.
 ( 172 ) 9-June 2013
Here I am creating the I-beam shape in the finger brace.
 ( 173 ) 9-June 2013
I go to all of the effort of creating I-beams with holes down the webbing in an effort to reduce the mass of the braces while retaining their stiffness. In terms of the acoustics of a guitar, a less massive set of sound board braces results in a more responsive guitar.
 ( 174 ) 9-June 2013
Here I am laying out the maple bridge plate.
 ( 175 ) 9-June 2013
And trimming it to shape.
 ( 176 ) 9-June 2013
And shaping it with the disk sander.
 ( 177 ) 9-June 2013
Finally, all of the top braces laid out for a look see.
 ( 178 ) 9-June 2013
The last element of the top is the sound hole reinforcing rim.
 ( 179 ) 9-June 2013
I use the leftover portion of the top blank to make the sound hole rim.
 ( 180 ) 9-June 2013
Here I am trimming the diameter of the two pieces of the rim.
 ( 181 ) 9-June 2013
And I lay it out under the braces to mark the portion to get trimmed off.
 ( 182 ) 9-June 2013
I use my small disk sander to put a bevel on the rim.
 ( 183 ) 9-June 2013
And then I lay everything out before gluing the braces in place.
 ( 184 ) 9-June 2013
A little bit of hand sanding to clean up the braces first.
 ( 185 ) 9-June 2013
And a few more details.
 ( 186 ) 9-June 2013
A bit of glue.
 ( 187 ) 9-June 2013
And back to the go-box..
 ( 188 ) 9-June 2013
More go-sticks.
 ( 189 ) 9-June 2013
Creating nice even pressure.
 ( 190 ) 9-June 2013
More go-sticks more-better.
 ( 191 ) 9-June 2013
And after the glue has cured a look at the sound board bracing layout.